If you think a little water damage can’t lead to a mold crisis, think again. Mold thrives in damp environments, making your home a potential breeding ground after water exposure. To tackle this issue effectively, you must implement key mold removal practices. Understanding the steps involved will protect your property and ensure a healthier living space. Let’s explore the essential strategies you need to know for effective mold management post-water damage.
Key Takeaways
- Conduct a thorough mold inspection to identify affected areas and assess the extent of damage before remediation.
- Ensure proper ventilation by opening windows, using fans, and using dehumidifiers to maintain humidity levels below 60%.
- Remove and properly dispose of materials showing signs of mold or excessive moisture, sealing them in plastic bags.
- Clean and disinfect surfaces with mold-specific cleaners, focusing on high-touch areas and wearing protective gear.
- Invest in mold-resistant materials and conduct routine inspections to prevent future mold growth effectively.
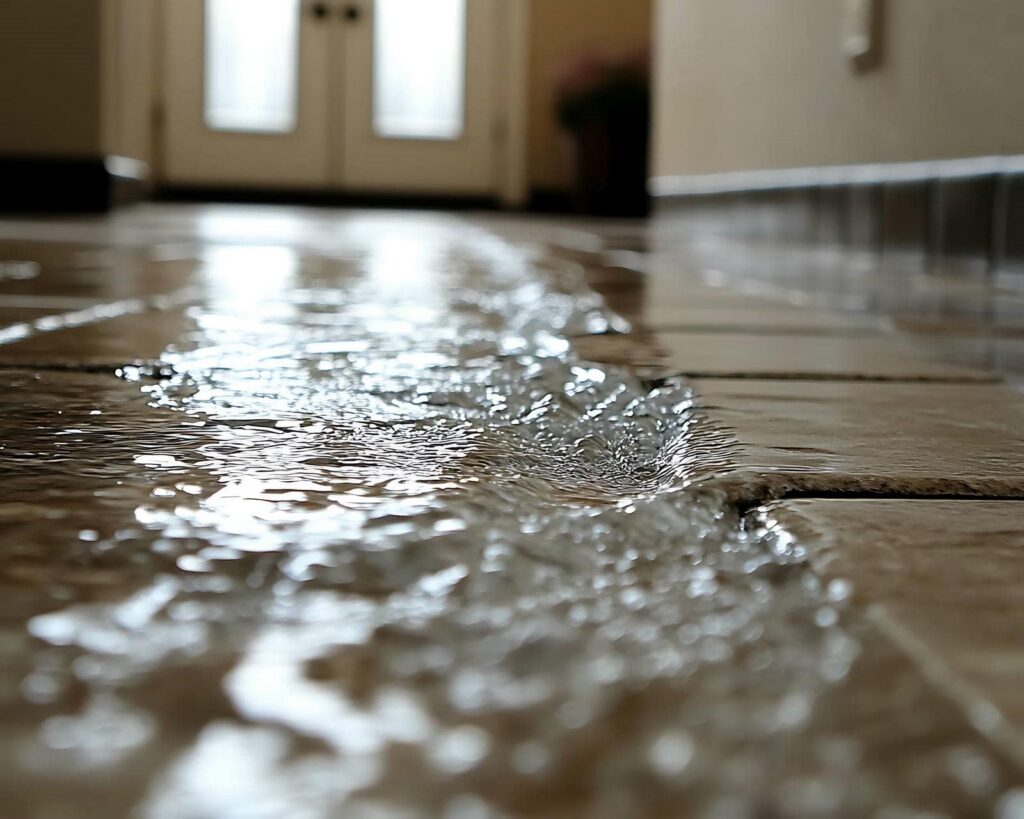
Assessing the Extent of Water Damage
When you encounter water damage in your home, evaluating its extent is vital for effective mold removal. Start with a thorough mold inspection to identify affected areas. Look for visible signs of mold growth, such as discoloration or a musty odor.
Next, conduct a damage evaluation by checking the structural components, including walls, ceilings, and floors. Use moisture meters to measure hidden dampness, as mold can thrive in unseen spaces.
Document your findings, noting the severity and location of damage. This information will help you prioritize your remediation efforts and determine if professional assistance is necessary.
Ensuring Proper Ventilation
To effectively combat mold growth after water damage, ensuring proper ventilation is vital. Without adequate air circulation, moisture can linger, creating a perfect breeding ground for mold.
Start by opening windows and utilizing fans to promote airflow throughout affected areas. This helps dry out residual moisture and facilitates faster evaporation.
Consider using dehumidifiers to maintain ideal humidity levels, ideally below 60%. This moisture control is essential in preventing mold spores from settling and thriving.
Don’t overlook areas like attics and basements, where stagnant air can worsen the situation. If necessary, install vents or exhaust fans to enhance air exchange.
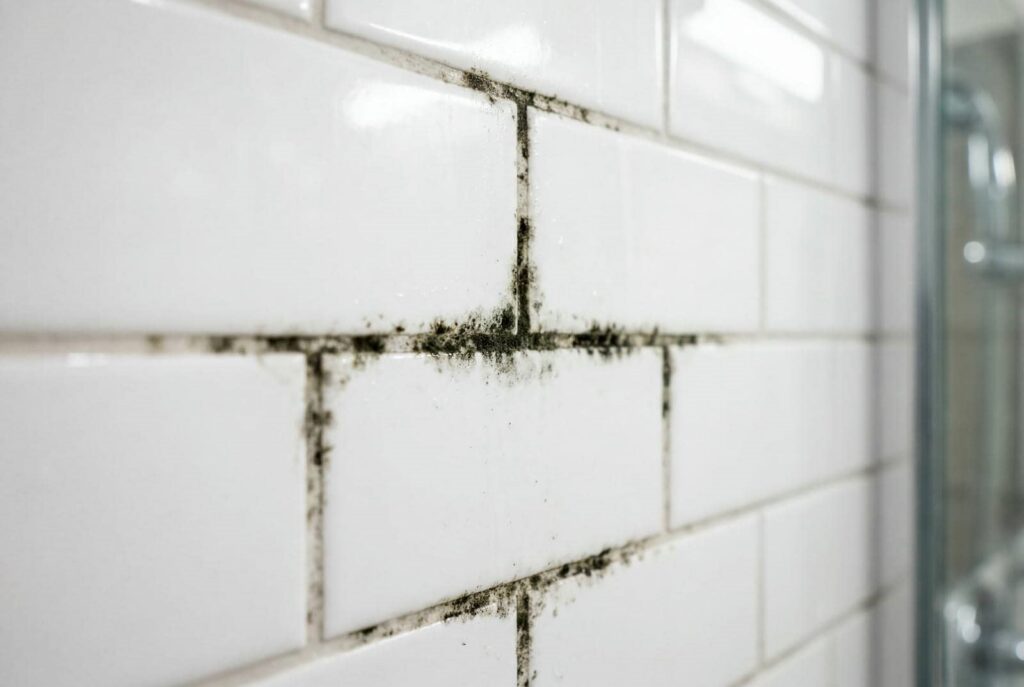
Removing Affected Materials
As mold can quickly infiltrate and compromise materials after water damage, it’s crucial to remove any affected items promptly.
Start by identifying materials that show signs of mold or excessive moisture, such as drywall, carpeting, and insulation. Once you’ve pinpointed these items, assess the level of damage; if they’re heavily contaminated, disposal is necessary.
Utilize proper disposal methods to ensure safety and compliance.
Seal contaminated materials in plastic bags before removing them from your home to prevent spores from spreading.
If you’re unsure about handling hazardous materials, consider hiring professionals who specialize in mold remediation.
Cleaning and Disinfecting Surfaces
Cleaning and disinfecting surfaces is essential after mold contamination to ensure a safe and healthy environment. You’ll want to start by using a mold-specific cleaner that targets spores effectively.
Pay close attention to high-touch areas like doorknobs, countertops, and light switches, as these are often overlooked yet vital for thorough surface sanitization.
When possible, consider employing mold-resistant materials in your repairs or renovations. These materials can help mitigate future mold issues and simplify your cleaning process.
After applying your cleaning solution, make sure you wipe down surfaces with clean water to remove any residue.
Don’t forget to wear protective gear, such as gloves and masks, during this process to safeguard your health.
Finally, allow the surfaces to dry completely, as moisture can foster mold regrowth. By following these steps, you contribute to a healthier living space for yourself and others.
Preventing Future Mold Growth
While eliminating existing mold is essential, preventing future growth demands ongoing vigilance and proactive measures.
Start by investing in mold-resistant materials for your home—these can markedly reduce the risk of mold taking hold. Items like mold-resistant drywall and paints can be game-changers, providing an added layer of protection against moisture intrusion.
Next, focus on humidity control. Aim to keep indoor humidity levels between 30% and 60%. You can achieve this through dehumidifiers, exhaust fans, and ensuring proper ventilation in areas prone to moisture, such as bathrooms and kitchens.
Regularly check for leaks around pipes and windows, sealing any gaps promptly to prevent water accumulation.
Lastly, conduct routine inspections of your property. This proactive approach allows you to catch potential mold issues before they escalate, ensuring your home remains a safe and welcoming space for you and your loved ones.
Frequently Asked Questions
How Long Does Mold Removal Typically Take After Water Damage?
Mold removal typically takes one to five days, depending on the severity of mold growth, duration, and the materials affected. You’ll want to act quickly, as faster removal often leads to better outcomes.
Can I Stay in My Home During the Mold Removal Process?
You shouldn’t stay in your home during mold removal, just like you wouldn’t linger near a fire. Prioritize mold safety by taking home precautions; leave until professionals ensure it’s safe to return.
What Are the Health Risks Associated With Mold Exposure?
Mold exposure can trigger mold allergies and respiratory issues, leading to symptoms like coughing, sneezing, and difficulty breathing. It’s essential to address mold problems promptly to protect your health and maintain a safe living environment.
Do I Need Professional Help for Minor Mold Issues?
If you find small patches of black mold in your bathroom, you might think DIY solutions will suffice. However, certain mold types can be harmful, so professional help is often a safer choice for thorough removal.
How Often Should I Check for Mold After Water Damage?
You should check for mold at least once a week for the first month post water damage, then monthly for six months. This mold detection frequency helps ensure your environment remains safe and healthy.
Recap
Effectively addressing mold after water damage is essential for your health and safety. By evaluating damage, ensuring ventilation, removing contaminated materials, cleaning surfaces, and preventing future growth, you can greatly reduce the risk of mold proliferation. Prioritizing these practices safeguards your living space and promotes a healthier indoor environment for you and your family.